


Ask anyone who has finished a big renovation what they would change, and the answer is rarely the tile. It is usually the order. They painted before the electrician came. They laid new floors, then watched a plumber cut through them. They bought a beautiful vanity that would not fit the plumbing.
The fun parts of a renovation, colors, fixtures, finishes, are what we dream about. But the dull parts, like pipes, wiring, and drywall, decide whether the fun parts survive. Do the work in the wrong order and you pay twice. Do it in the right order and each stage protects the one before it.
This guide gives you the order, in two layers: the order of rooms across your whole house, and the order of trades inside each room. It is a plain-English plan you can hand to a contractor or follow yourself.
The short version
Plan and permit first. Make the house dry and sound. Fix the structure, then the hidden systems. Close the walls. Finish the wet rooms. Then floors, paint, and decorating. Pretty comes last, because everything pretty is the easiest thing to damage.
Two kinds of order (most guides mix them up)
When people ask “what order should I renovate in?” they mean one of two things. Keeping them apart makes the whole plan clearer.
- The room order: which parts of the house you tackle first, second, and last across the whole project.
- The trade order: the sequence of work inside any single space, from demolition to the final coat of paint.
The room order is where you decide priorities and budget. The trade order is the physics: pipes before drywall, drywall before paint. You need both.
Before you touch anything: six steps
The best renovation order starts before the first hammer swing. Skip this part and the rest gets harder.
- Walk the house with a notebook. Look for water stains, cracks, soft floors, drafts, and anything that makes you pause. Our list of signs your home needs a renovation helps you spot the quiet problems.
- Test before you demolish. If the house was built before 1978, it may have lead paint. The EPA says about half of homes from before 1978 contain it, rising to roughly two out of three for homes built from 1940 to 1960 and nine out of ten for homes built before 1940. Paid contractors who disturb that paint must be EPA-certified and use lead-safe methods. Older homes can also hide asbestos in materials like some floor tiles, pipe wrap, and textured ceilings, so test before breaking anything. Start at the EPA lead page.
- Set the budget, plus a cushion. Remodelers commonly suggest holding back 10 to 20 percent for surprises, and older houses often use all of it.
- Sort out permits. Structural, electrical, plumbing, and layout changes usually need them, and inspections can pause the schedule. Our permits guide explains what to expect.
- Get written quotes and a written sequence. Ask each contractor to walk you through the order of work before you sign. If they cannot, that tells you something. See how to compare bids in our guide on reading a contractor quote.
- Decide how you will live. Where will you cook, bathe, and sleep? Settle that now, not on demo day.
The whole-house order, stage by stage
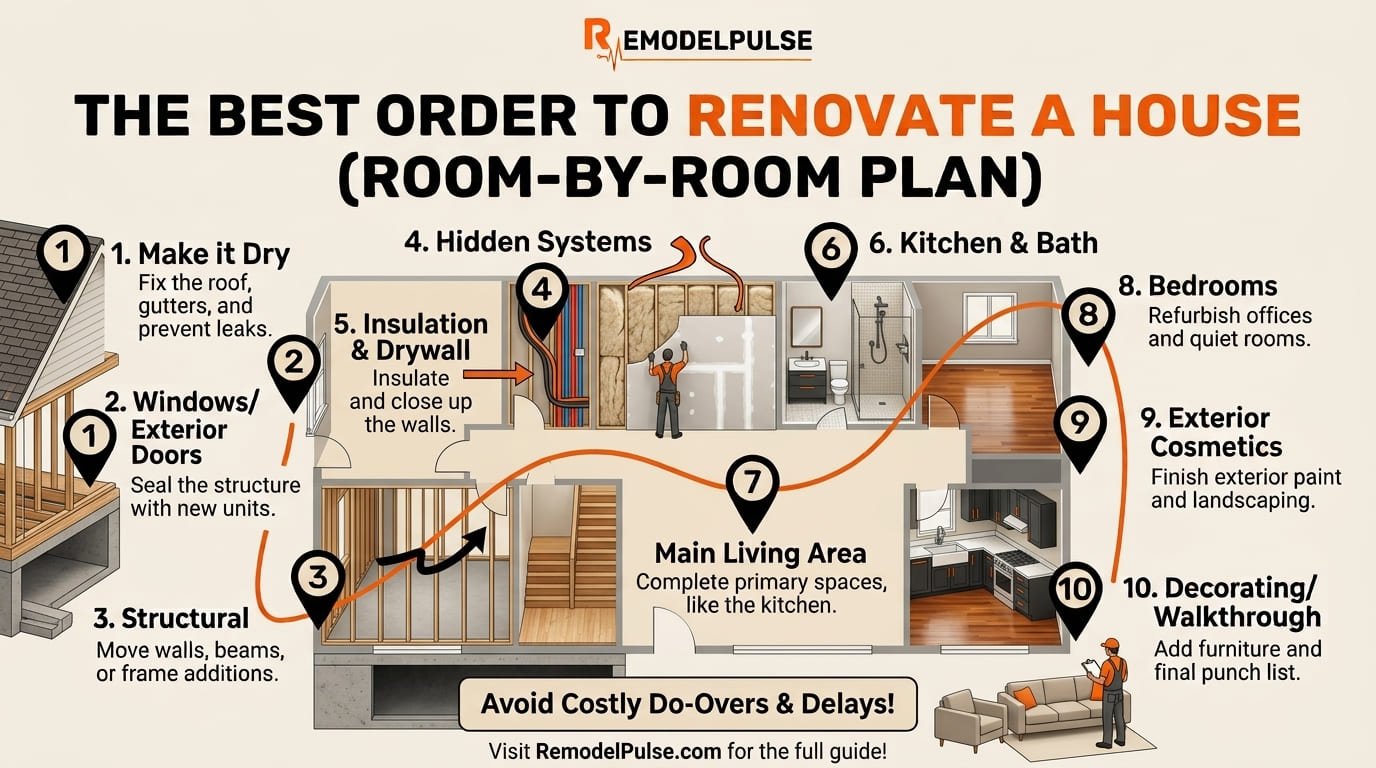
Here is the sequence most experienced contractors follow for a full renovation. Not every house needs every stage, so skip the ones that do not apply. Keep the order.
Stage 1: Make the house dry and sound
Fix anything that lets water in before you spend a dollar on anything interior. That means the roof, flashing, gutters and downspouts, grading around the foundation, and any leaks. Interior finishes do not survive moisture. If a basement or crawl space is damp, solve that now.
Stage 2: Windows and exterior doors
New windows and doors make the house weather-tight, and they affect the interior trim and wall edges, so they come before drywall and paint. They are also a long-lead item, so order them early. Siding and masonry repairs that touch the structure belong here as well.
Stage 3: Structural changes and layout
This is where walls move, beams go in, and additions are framed. It must come before any wiring or plumbing, because those systems follow the walls. If you want an open-concept layout, settle it now. Remember that a wall that looks decorative can be carrying the roof.
Stage 4: The hidden systems (rough-in)
With the walls open, run the new plumbing, electrical, and HVAC. Plumbing usually goes first because pipes need the most space and are hardest to reroute. Electrical and ductwork follow. This is the best moment to upgrade the panel, add outlets, rough in a future bathroom, or run low-voltage wiring.
Then comes an inspection. Nothing gets covered until the rough-in passes.
Stage 5: Insulation and drywall
After the inspection, insulation goes in, then drywall is hung, taped, and finished. While the walls are open is the cheapest time to add insulation and seal air leaks. The EPA’s ENERGY STAR program estimates that air sealing plus insulation saves the average homeowner about 15 percent on heating and cooling costs. Drywall finishing also takes days of drying, so build that time into your schedule.
Stage 6: The wet rooms, kitchen and bathrooms
Kitchens and bathrooms usually come before the rest of the interior. They have the most plumbing, the most trades, and the longest lead times, so they set the schedule for everything else. Work them early and the rest of the house can follow while you wait on deliveries. For tight bathrooms, our small bathroom remodel ideas can save you from layout mistakes.
Stage 7: Floors, paint, and trim in the main living areas
Now the visible surfaces go in. The usual order is primer and a first coat of paint, then flooring, then baseboards, doors, and trim, then the final paint. A common approach is to work from the farthest room back toward the front door, so crews never walk across finished floors.
Stage 8: Bedrooms and low-traffic rooms
Bedrooms, offices, and hallways come late because they need the least trade work and can wait. They are also your safe retreat during construction. Leave one or two livable until the dust settles.
Stage 9: Exterior cosmetics
Painting, porch rebuilds, and landscaping come near the end so heavy equipment and deliveries do not wreck them. Time exterior paint and sealers for mild, dry weather, since most products list a minimum temperature on the can.
Stage 10: Decorating and the final walkthrough
Furniture, art, curtains, and finishing touches go last. Do a slow walkthrough with a roll of painter’s tape. Mark every scuff, gap, and missing screw, and agree on a punch list before the final payment. If you are inspired by what is popular, see our guide to home renovation trends for 2027 before you pick finishes.
Inside each room: the trade order
Whether it is a kitchen, a bath, or a basement, the sequence inside the room follows the same logic: each step protects the one before it.
| Step | Work | Why it goes here |
|---|---|---|
| 1 | Demolition | Clears the way and reveals surprises |
| 2 | Framing and structural changes | Walls and openings must be final before systems |
| 3 | Plumbing, electrical, HVAC rough-in | Pipes and wires go inside open walls |
| 4 | Rough-in inspections | Nothing gets covered until it passes |
| 5 | Insulation, then drywall | Closes the walls; takes drying time |
| 6 | Primer and first coat of paint | Easier before cabinets and trim are in |
| 7 | Flooring | Protect it afterward; some trades set it after cabinets |
| 8 | Cabinets, then countertops | Counters are measured after cabinets are secure |
| 9 | Tile backsplash, fixtures, appliances | Final connections and visible finishes |
| 10 | Trim, final paint, final inspection | The last details and sign-off |
A caution: contractors do not all agree on every step. Flooring goes before cabinets in some projects and after in others, and tile can go either way. Ask your contractor why they do it their way, and make sure they have coordinated the order with every trade.
Order the slow stuff first
The biggest schedule killer is not the work itself. It is waiting for something that has not arrived. Cabinets, windows, appliances, and specialty materials can take weeks, so order them while the demolition is still happening. Lead times vary a lot by supplier and by year, but published 2026 guides give a rough picture.
| Item | Typical wait (rough) | Tip |
|---|---|---|
| Stock cabinets | About 1 to 4 weeks | Check that the exact sizes are actually in stock |
| Semi-custom cabinets | Roughly 4 to 10 weeks | Needs a final layout and field measurements |
| Custom cabinets | Often 8 to 16 weeks | Longest critical path in most kitchens |
| Some appliances | 1 to 4 weeks, up to 16 or more for high-end | Order early; specs affect the cabinet plan |
| Specialty tile | 1 to 2 weeks in stock, up to about 8 for imported | Pick it before you need it |
| Stone countertops | Often 3 to 5 weeks after measuring | Measured after cabinets are set |
These ranges come from supplier and remodeler guides and vary by region and season, so get a written delivery date from every vendor. If you are choosing cabinets, our comparison of RTA vs assembled cabinets shows how format affects timing.
Living in the house while it happens
If you are staying put, think in zones. Work on one part of the house while the rest stays livable, and keep a clear path between them. Seal off the work area with plastic sheeting and keep a zip door in the plastic, so dust does not travel.
- Keep one bathroom working. This is the first thing to protect.
- Set up a temporary kitchen with a microwave, a hot plate or induction burner, a small fridge, and a folding table before demolition starts.
- Protect floors and vents in rooms you walk through, and cover or close HVAC returns near dusty work.
- Plan for delays. Renovations nearly always take longer than we expect, so build slack into any deadline you care about.
If you can move out for the loudest stage, even for a few weeks, it often saves money and stress. Many families find it gets them through the rough middle.
Mistakes that force a redo
- Painting or flooring before the hidden systems are done. Cutting open a new wall to fix a pipe is a painful way to learn the lesson.
- Ordering cabinets before the layout and appliances are final. A wrong size means weeks of delay and a replacement cost.
- Buying fixtures before checking the rough-in. Measure the plumbing positions first, so the vanity and faucet actually fit.
- Skipping inspections. Covering up uninspected work can mean tearing it open again later.
- Starting with the fun stuff. It is tempting to pick paint colors first because it feels like progress. But the first week should go to pipes, permits, and schedules, not swatches.
- Gutting everything at once. Opening the whole house at once stretches your budget, your patience, and your living conditions.
- Forgetting the cushion. Hidden wiring, rot, and old plumbing show up the moment walls open.
Frequently asked questions
What should I renovate first in a house?
Start with anything that affects safety, water, or structure: roof leaks, foundation moisture, faulty wiring, and rotten framing. After that, handle hidden systems and the wet rooms (kitchen and bathrooms), then floors, paint, and decorating.
Should I renovate the kitchen or the bathroom first?
Either can go first, but do them close together if you can, since both involve plumbing and long-lead items. If you have only one bathroom, keep it working, and renovate the kitchen first or schedule the bath in a short, planned window.
Do you paint before or after flooring?
Most contractors apply primer and a first coat of paint before flooring, then do the final coat after trim is installed. Some prefer flooring first. Ask your contractor which method they use and why.
Is it cheaper to renovate everything at once?
Often, yes, because trades come once, walls are opened once, and you avoid re-doing finished work. But it costs more up front and is harder to live through. Whole-house projects work best with a clear budget and a phased plan.
How long does a whole-house renovation take?
It depends on size and scope. Published 2026 timelines put mid-range kitchen remodels at roughly 6 to 12 weeks of on-site work, plus weeks of planning, and full gut projects at 12 to 16 weeks or more. A whole house can take many months, so ask for a written schedule.
Final thoughts
A renovation is really a series of decisions made in order. The right sequence is not about being cautious. It is about making each decision once, instead of paying for it twice. Get the water out, get the bones right, tuck the systems inside the walls, and only then bring in the beauty.
If you take one thing from this guide, make it this: ask for the order of work in writing before anyone starts. A good contractor will be glad you asked, and you will sleep better knowing every stage protects the next one.
Keep planning your project
More practical, plain-English guides on costs, permits, design, and hiring from the RemodelPulse team.